Short version: I am managing my TiddlyWiki wikis as stand-alone HTML documents using a WebDAV server accessed securely from anywhere via Tailscale and I can now drag and drop images into content and have them uploaded and linked automatically. It’s brilliant!
As much as I love TiddlyWiki, I’ve never enjoyed managing images with it. Embedded images are easiest but can quickly bulk up the wiki’s HTML file size, so I reference them instead. I’ve done this a couple ways.
The cheat version is to just use the embed code of an image I’ve previously uploaded to Flickr. The second best option is to put the images in a /files directory within the same directory as the wiki itself and reference it using something like [img[files/my-image-file.png]].
It’s not hard to do, but having to move each image to my wiki/files directory, then hand-write the path/filename to create a link adds just enough friction to prevent me from using images as freely as I might otherwise.
TiddlyWiki 5.2.0 was released recently, and it includes a great new feature that lets me drag and drop an image into an open “tiddler” which is then embedded and linked automatically. This is a terrific improvement, but it still embeds the image within the wiki file, which I was hoping to avoid.
Enter the File Uploads plugin from Saq Imtiaz and with it a brand-new PUT option for WebDAV.
This is all pretty new to me, so I’m probably not qualified to write a full-on tutorial, but here’s what I did…
Upgraded my wiki to 5.2.0. (https://tiddlywiki.com/upgrade.html)
Installed the File Uploads plugin and the accompanying PUT plugin via simple drag and drop into my wiki file (TiddlyWiki is cool that way).
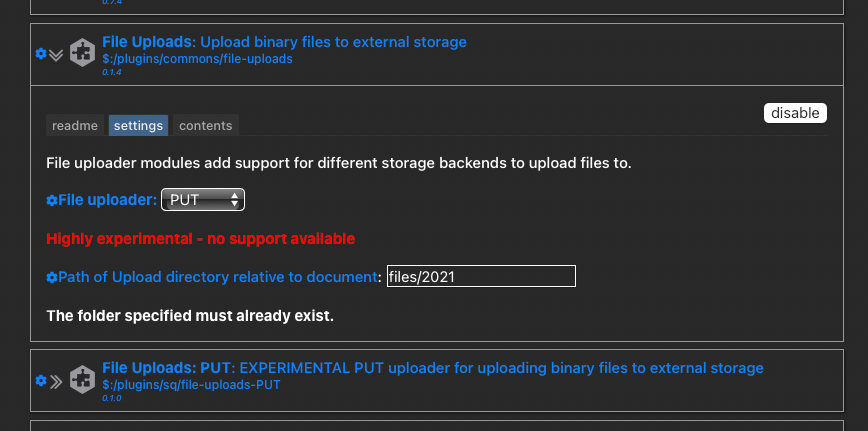
Configured the plugin by telling it to use the “PUT” uploader and where I’d like uploads to go (relative to the wiki file itself). I chose “files/2021”.